Sunday, December 23, 2018

Why "Application blocked by Java Security" appears?


Application Blocked by Java Security

If you encounter a Java applet in your web browser, and see a window display that says Application Blocked by Security Settings, don't be alarmed. Your security settings have blocked an application from running with an insecure or expired jre or maybe the web server on the device does not allow SSL connection at the moment. Otherwise It may be due to running an old version of Java on your computer. This alert displays to help protect your computer system from potential vulnerabilities that may exist in older versions of the plug-in. By blocking the application, it is not allowed to run in your web browser.

When using Ubiquity radios they come with a spectrum analyzer application which help to see what other frequencies are currently being used in the given environment. The tool is quite handy when you are looking for a channel that is not too crowded and can be used to host your bandwidth. Sometimes when accessing the Air View or spectrum analyzer you may be required to install the latest Java Runtime environment. When you have the latest Java RE installed then you may be required to adjust the security settings in order for the Air View to work correctly. This can be a hassle when you are faced with the following prompts.
This prompt basically means that the air view application does not meet Java security requirements in order for it to run in the browser. The Java runtime requires for the app to be access via SSL connection over the browser. Java also requires the app to be in the exception list if the CA certificate cannot be verified. There is a work around for this. Some sites say to adjust the security setting or contact the ubiquity. But the workaround is much easier as long as you are comfortable with using SSL connection with unverified certificates.

Follow the following steps for the workaround. 

1. Click on Start and type in Java. Click on Java Configure app. At the security settings tab add the websites or IP address you wish for Java to run with. Include the full IP address with secure port number if using IP address. In my case its 192.168.1.12:997
Click on Apply then OK.

2. Login to your application web server and allow for HTTPS connection using SSL. This can be achieved by accessing the settings page on the Ubiquity radio and turning ON the connection for SSL. In my case this can be done on one of the ubiquity radios i'm using. You will also need to set the SSL port. Mine is 997
3. Restart your browser for the settings to take effect on the Java Applet.

4. Login to your device or radio with the IP address listed in the exception list created in step 1. For mine, i i typed in the following address including https. https://192.168.1.12:997.

5. You will be presented with the following page. Click Accept the Risk and Continue.
6. Login with admin credentials. 

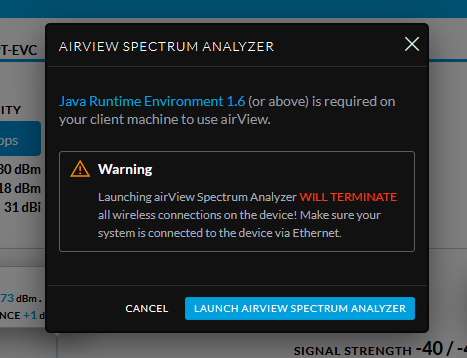
7. Click on Air View or the app that requires Java to run on. For mine i clicked on the Air View app to run it.
Click on Air View Spectrun Analyzer.

Click on Open With when you are presented with the following Save As dialog box.


8. You will then be presented with the following security screen prompt.


Click on Continue.

9. Wait for the air view app to load.


 You will see the Air view Spectrum Analyzer panel when it has successfully loaded.


Saturday, June 9, 2018

How to Install an Ubiquity Access Point Outdoor+

This piece of equipment is from Ubiquity and is a legacy device and most likely support for it has stopped. You will find the datasheet for the new models on at ubquity. If you scroll to the bottom of the page you will see the downloads section.
I will show you tips on installing the device near the building or on the building.


Firmware Upgrade

The first thing you would want to do is to perform a local upgrade on the UAP Outdoor+. This will mean connecting the device to a computer or laptop. Download the latest firmware from the firmware downloads section and save to a location on your computer. Follow this link to download the firmware Link.
You should also download WINSCP and PUTTY if you don't already have it on your computer.
Now for this part its a bit technical so get someone with networking experience if you don't know how to do it. You need to make your computer with the IP address 192.168.1.2X because the default IP address of the UAP with 192.168.1.20 and you will need your computer to connect to it.

Once you are able to ping 192.168.1.20 from you computer then use WINSCP to upload the firmware to the \tmp folder. Login credentials is default at ubnt for both username and password. Rename the firmware to fwupdate and then close the connection.
Open your putty program and login with the default credentials.Type the following command in the bash prompt; syswrapper.sh upgarde.sh

The upgrade process will start and you might lose connection and this point.

Adoption

When you are done with the upgrade then connection your UAP to a Unifi Controller and click on the Adopt option. When for the adoption process to finish. You device will be ready to deploy. You can configure additional options such as the SSID on the controller itself.


Mounting 

 You can chose where you want to mount the UAP. The most preferred option is to mount it on a pole in the middle of the vicinity where you want your wireless signal to spread to. I have opted to mount my device next to my window which gives me a range up to 150m. This cuts pretty close to the recommended range of 183m.


Due to the nature of the antenna it gives a full 360 degree signal range which is why on a pole is a better option and not against the wall. 


I do hope this gives you a general idea on how to properly install and setup. Your wireless signal may interfere with others so make sure the channel is set to automatic. And yes the options are in the unifi controller.


Happy Surfing.!